
Common problems with notebook displays often stem from either mishandling leading to mechanical damage or manufacturing defects. Not all disruptions in image display on the monitor are directly related to a faulty display, hence the importance of seeking professional diagnosis. Identifying the symptoms can help pinpoint the issue and determine which parts of the laptop may need replacement.

Indications of Display Problems
Let’s delve into the primary indicators of notebook display malfunctions and other monitor components:
- “Aurora Borealis” Effect: Vertical bands with erratic color changes. Applying light pressure results in colored horizontal bands in the middle of the screen. These signs typically point to a malfunction in the notebook display cable, with most display irregularities resolving after its replacement.
- Partial Image Display: At startup, only a portion of the image is visible, while the rest of the screen is covered in multicolored stripes. This scenario signifies severe damage to the display, rendering repair unfeasible. A replacement of the original or compatible part is necessary.
- Flickering Image: If the display image flickers, appears and disappears, or exhibits periodic horizontal stripes, it often indicates a cable issue necessitating replacement.
- Color Inversion: Sudden shifts from white to black, yellow to red, and back indicate serious display damage, warranting a replacement.
- Reddish Ripples: This symptom could indicate either a display malfunction or a connection problem with the motherboard. If the issue persists after replacement, it suggests a problem with the video card-motherboard connection.
Diagnosing the Laptop Screen
Various methods exist to pinpoint faults in the laptop display and determine potential solutions. Initially, it’s crucial to ascertain whether the malfunction lies in the display or if a video card failure is the culprit. Connecting the laptop to an external monitor can provide a definitive answer. If the image appears fine on the external monitor, the issue likely resides in the display. However, exceptions exist, with some video card problems still allowing a clear image on the monitor.
For cases of intermittent defects, examining the display for mechanical impacts like bending or twisting is advisable. If even a slight tilt alters the image, a display replacement is in order. Finding a compatible screen for your laptop has become increasingly convenient. Simply knowing the laptop model can lead you to the right part. Numerous online stores, such as Zeto.ua, Amazon.com, ebay.com, offer intuitive search engines.
Additionally, observe any image alterations when opening or closing the laptop. If opening the laptop lid triggers image changes, the issue likely lies in the laptop cable.
Selecting the Right Screen
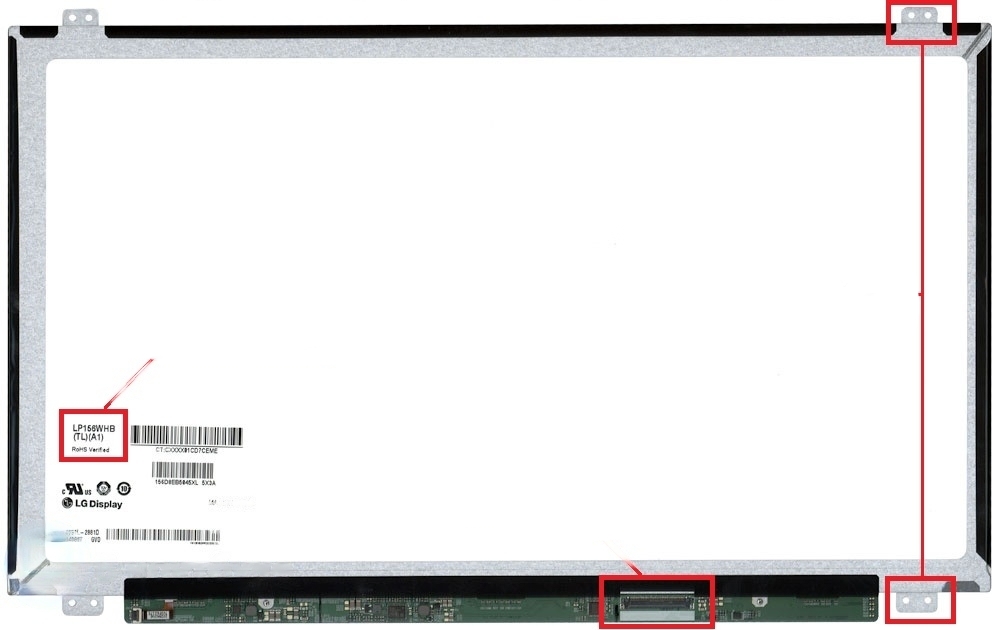
The matrix’s diagonal size is indicated in the part number’s initial three digits. For instance, in the LP156WHB(TL)(A1) matrix, “156” signifies a 15.6-inch diagonal. Resolution may also be included in the marking, but cross-checking with the device documentation or our website is recommended for accuracy.
The matrix connector facilitates its connection to the motherboard through a flat cable. Modern notebooks employ LVDS connectors (with 20, 30, 40, or 50 pins) or eDP connectors (with only 30 or 40 pins). The connector’s placement (right or left side) varies by notebook model. Verify the connector’s position on the matrix and refer to its part number for details on type and pin count, readily available on our website or online. Note that LVDS connectors are typically designated solely by numbers (e.g., 40), while eDP connectors also specify their type (e.g., eDP 30).
With the rise of compact notebooks and Ultrabooks, manufacturers introduced Slim and UltraSlim models. While they can be visually distinguished, it’s advisable to confirm the thickness on our website or online.
Finally, consider the matrix’s fastening method. Most screens lack additional fasteners, but certain models may feature top-bottom or left-right tabs, as illustrated in our first photo.